 Beginning December 2, 2025, as part of our R18 Update, QuickBooks Desktop Pro Plus, Premier Plus, and Desktop Enterprise, we have made the following product improvements to the Pro/Premier/Accountant and Desktop Enterprise platforms:
Transaction Detail Improvements (QuickBooks Desktop Enterprise 24.0 R18 and higher)
Many companies deal with a large number of sales and purchase transactions on a daily basis, proportionately spending more time creating and managing them. Connecting vendor details and creation dates for each sales transaction can be time-consuming and manual. Even standard audit trail reports require significant customization to be used for this purpose.
However, connecting vendor and creation/last modified dates with your sales/purchase transactions is valuable for improving your ability to:
- Trace each sold item back to the original vendor.
- Manage item returns and warranty claims.
- Identify preferred vendors and track vendor performance.
- Reduce manual effort with data reconciliation between sales and purchase workflows.
- Simplify reporting for reseller and wholesale businesses.
With our improved transaction details, Vendor details can now be included directly on sales forms, and Creation/Last Modified dates are included in all transactions. These improvements help you:
- Save time: Creation and modification date and vendor details can be included in all transactions and sales forms which saves users time in manual reconciliation.
- Increase productivity and accuracy: Automatically link raw materials or inventory items to specific vendors for auditing, profitability reporting, returns, or warranty claim efficiency.
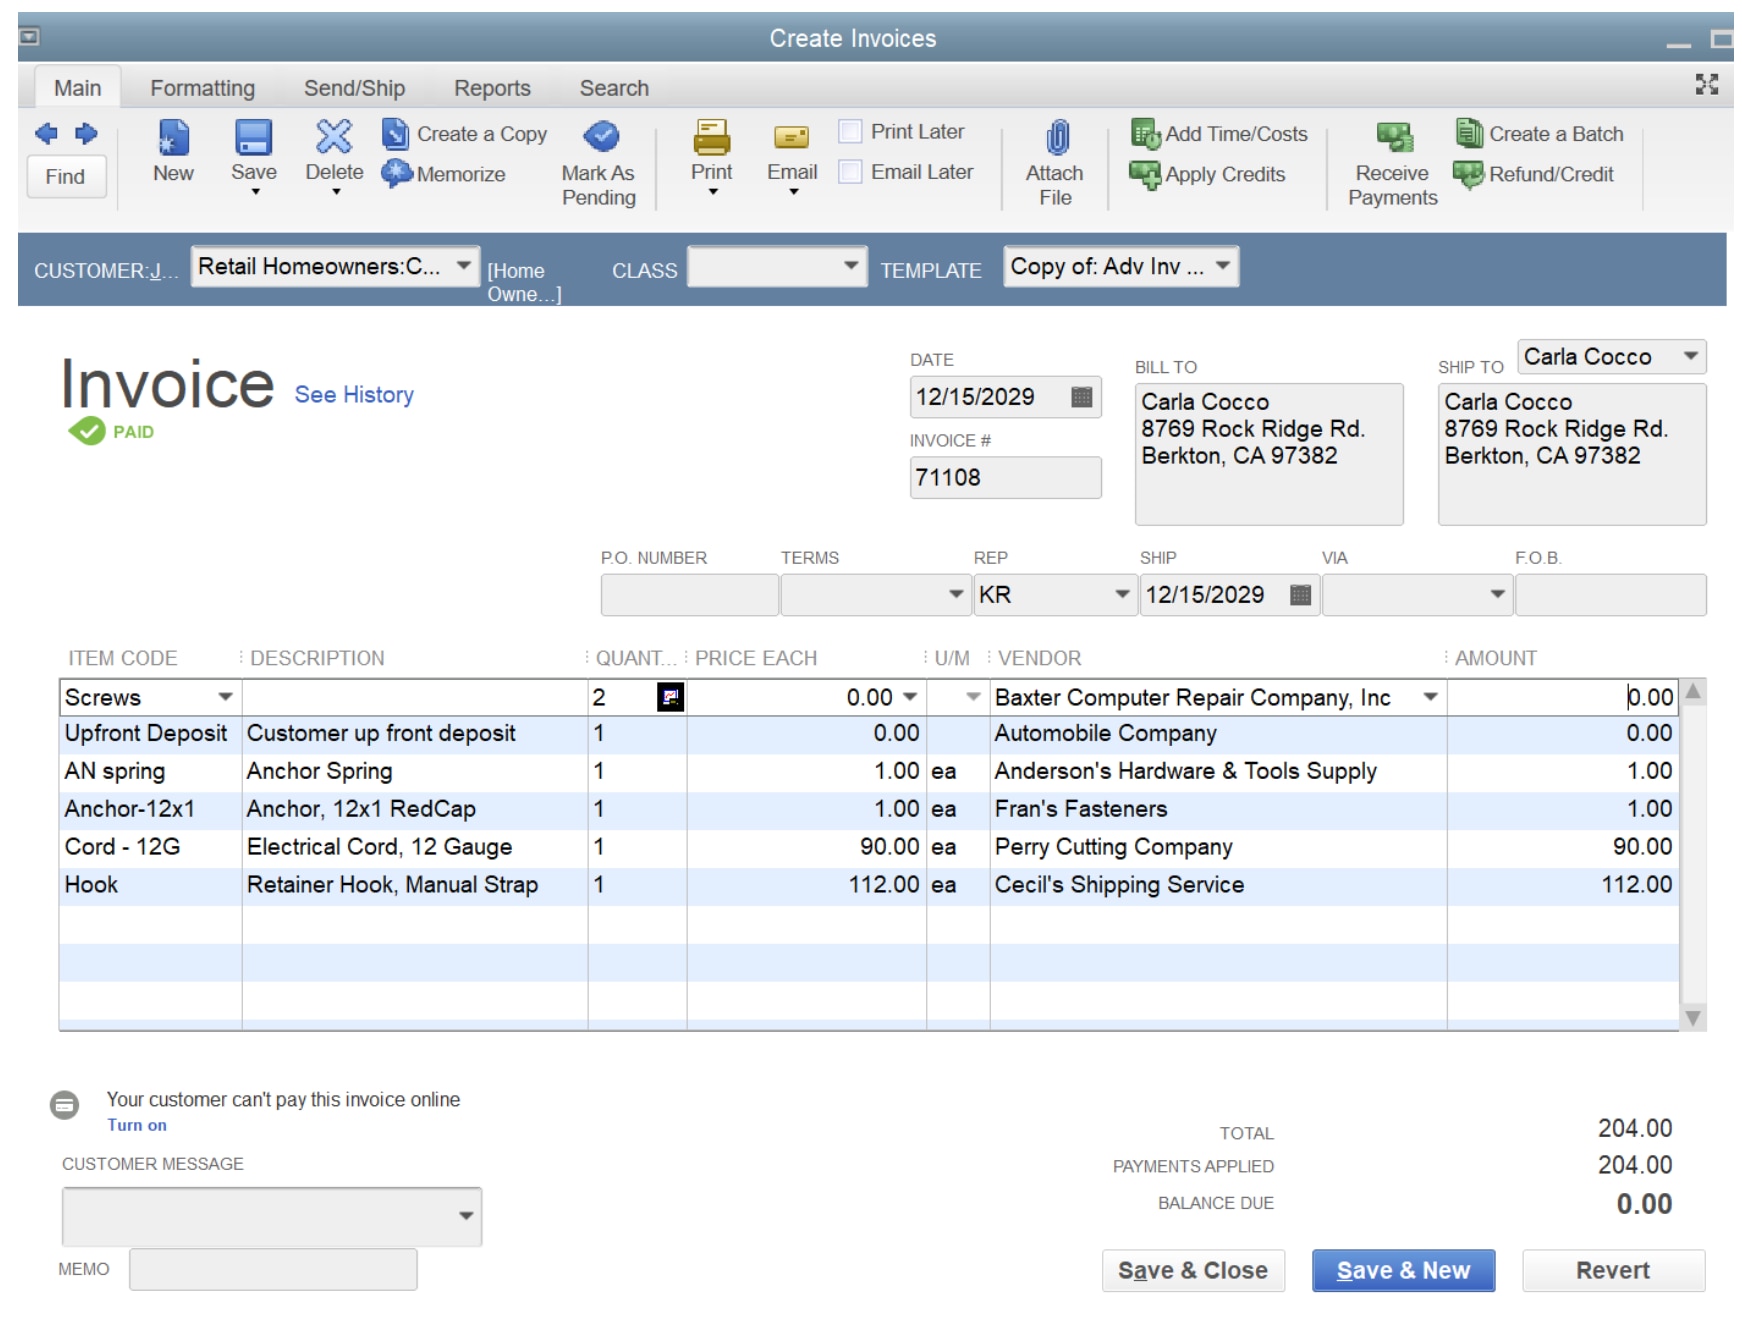
Add vendors directly to sales
Estimate Inactivation (QuickBooks Desktop Pro Plus, Premier Plus, and Desktop Enterprise)
In QuickBooks Desktop, after a sales order or invoice is created from an estimate, the original estimate remains in an active state. This can lead to confusion for team members, suggesting the estimate is still valid or requires action. The manual process of deactivating these estimates is inefficient, particularly for businesses with high sales volume. This feature aims to automate the deactivation process, improving workflow and reducing potential errors.
With R18, you can immediately deactivate estimates after a sales order or invoice is created, saving you time and reducing manual effort.
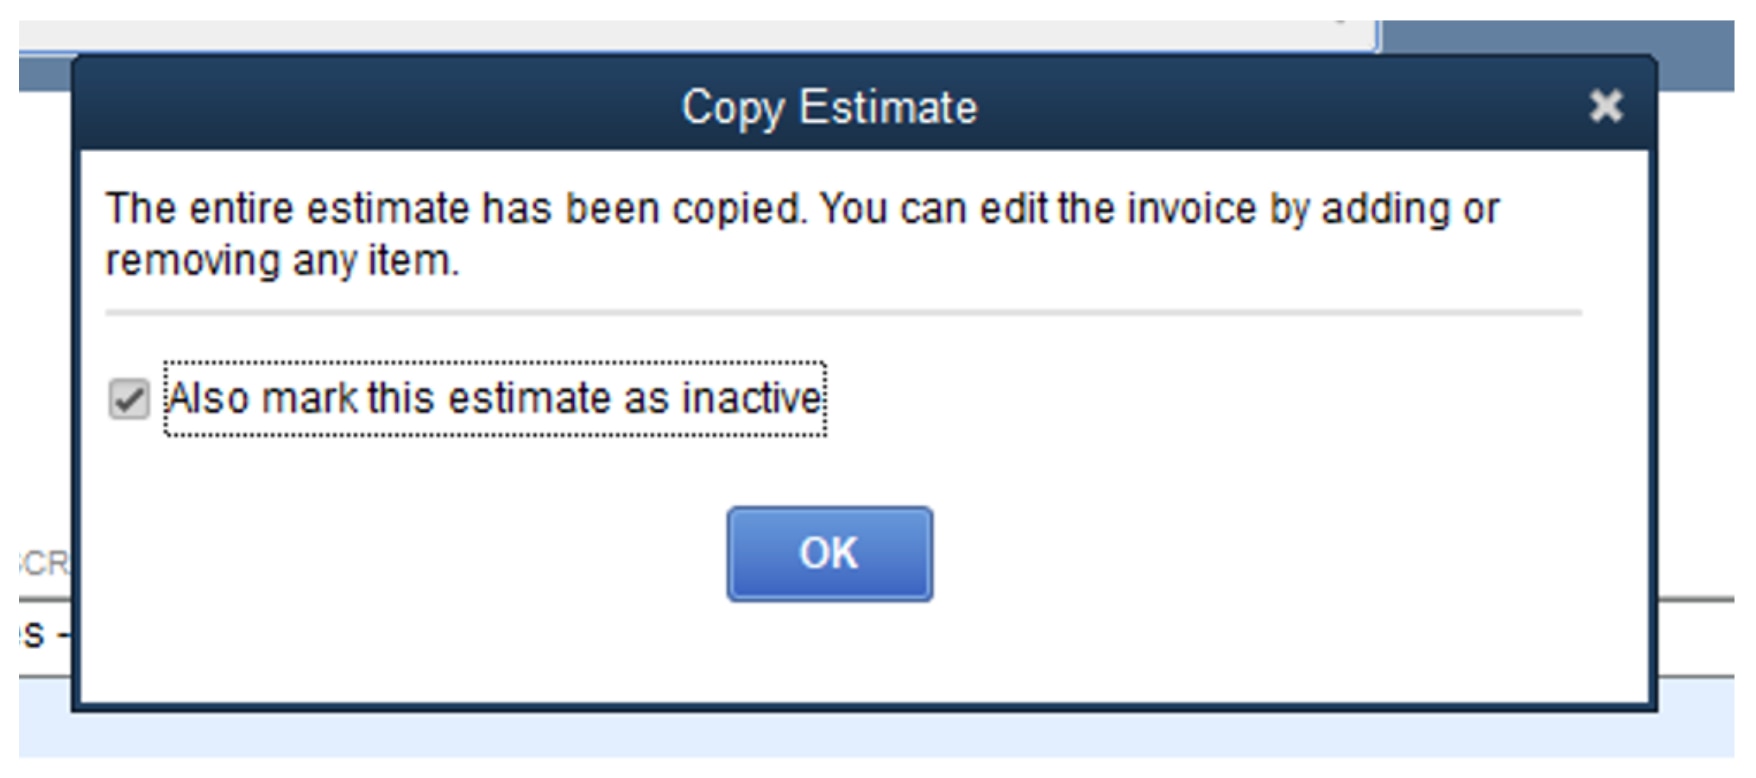
This pop-up window appears after a sales order or invoice is created from an estimate and provides the option to deactivate the used estimate.
Previous updates
On September 9, 2025, several exciting updates to QuickBooks Desktop Pro Plus, Premier Plus, and Enterprise went live as part of our R16 Update. These updates include improvements to the Pro/Premier/Accountant and Enterprise platforms.
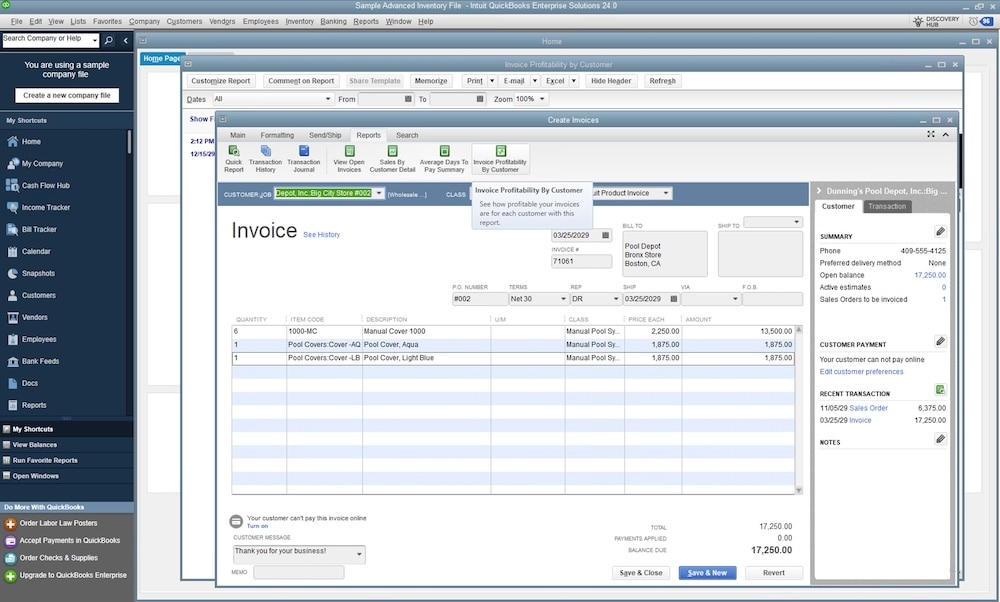
Invoice Level Profitability Reporting (QuickBooks Desktop Enterprise 24.0 R16 and higher)
Analyzing profitability at the invoice level allows businesses to make informed decisions about pricing, cost management, and resource allocation. Now, QuickBooks Desktop Enterprise makes it easier to generate these reports automatically without time-consuming manual creation and workarounds.
With Invoice Profitability reports users are able to:
- Identify the most profitable and least profitable transactions to help make better business decisions, such as changing prices, focusing on top customers, and managing costs.
- Easily compile all invoice transactions by Customer and view aggregate profit margins, % margins, and % markups.
- View profitability details for each individual invoice or by customer account.
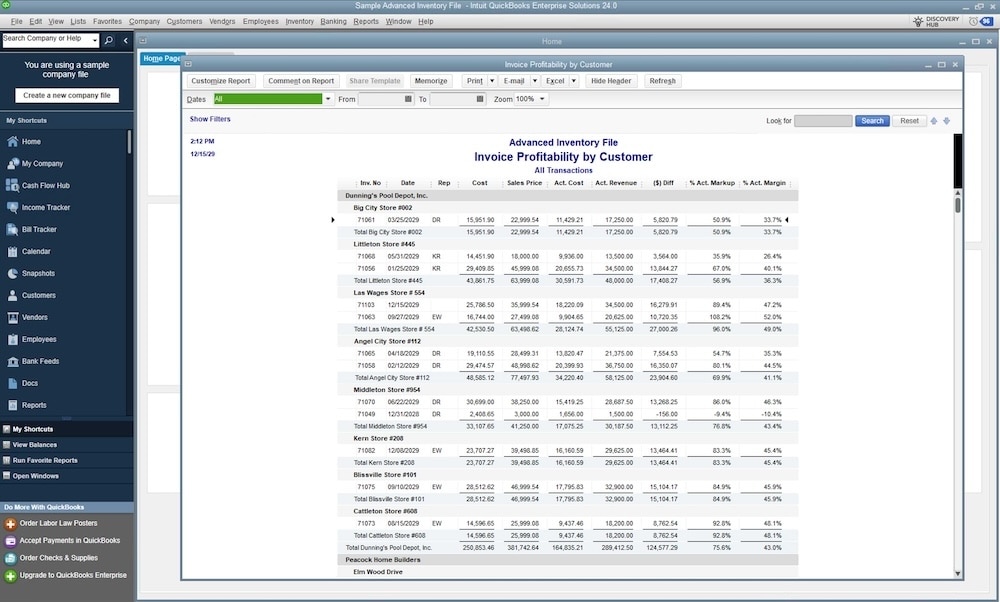
Invoice profitability from a Customer view
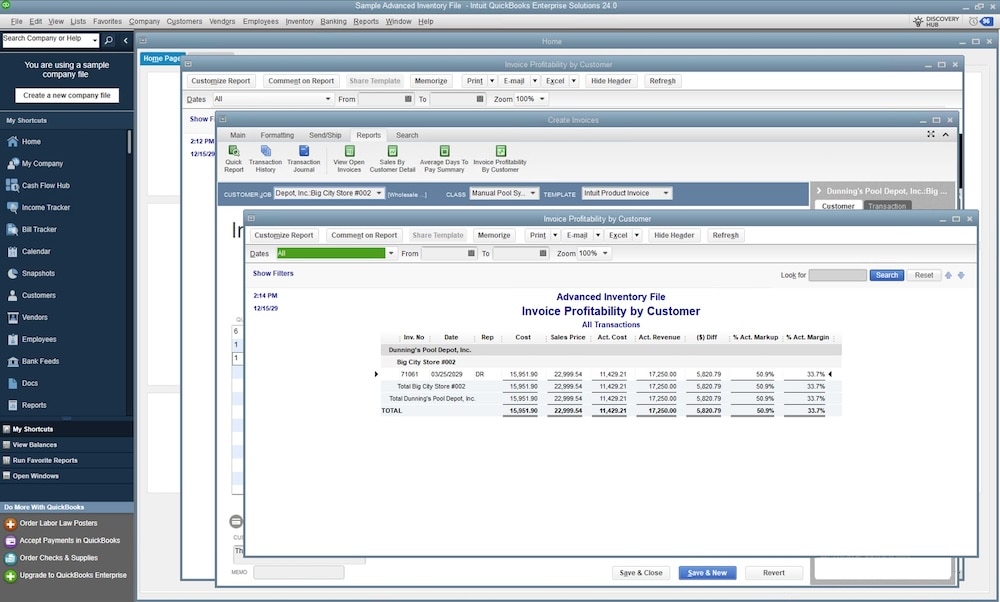
Individual Invoice view of profitability
You can access the Invoice Profitability report from the main Reports menu.
- Go to the Reports tab.
- Select Customers & Receivables.
- Select Invoice Profitability by Customers.
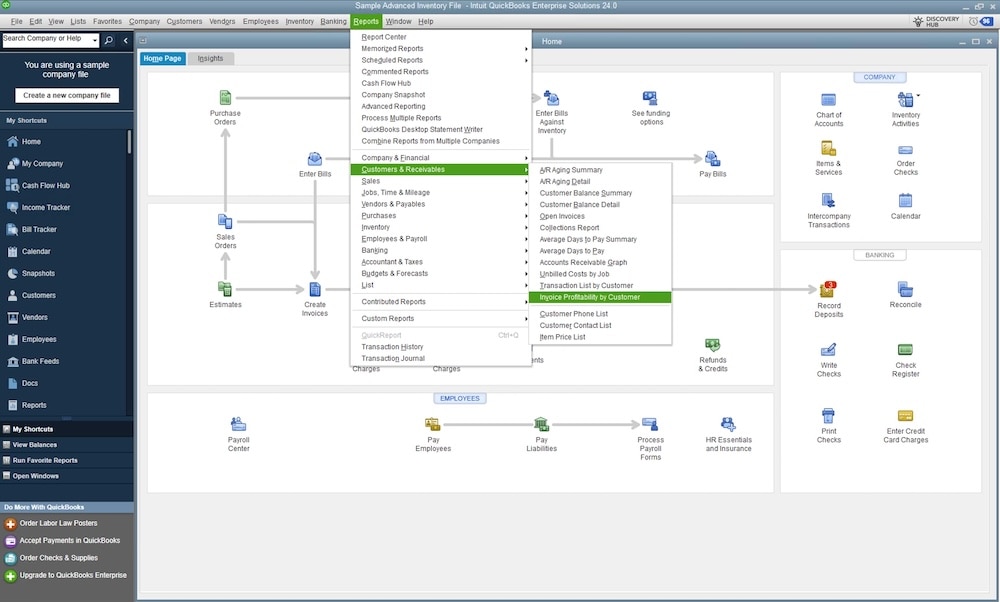
Tip: You can also find this report through an invoice. Open an invoice, then go to the Reports tab. Select Invoice Profitability by Customer.
Email sales forms, invoices, and statements in QuickBooks Desktop (QuickBooks Desktop Pro Plus, Premier Plus, and Enterprise)
You can email sales forms, estimates, invoices, statements, and more to your customers directly from within QuickBooks Desktop. You can send them individually, as a batch, or save them to send when you’re ready. This helps you save time when communicating to your customers so you can focus more on your business.
As an added convenience, you can designate different default email contacts for each type of email you send to your customers. Estimates, invoices, sales receipts, and more are directed to the person you want, automatically. This enhanced emailing feature lets you enjoy the following:
- Improved efficiency: Quickly find and select the contact email directly from the transaction window. This helps you save time because you don’t have to manually enter your customer’s email address.
- Enhanced clarity: The recipient list in the “To” field clearly shows the contact’s name and job title. This reduces the risk of misdirected emails.
- Increased convenience: For each email type you send to a customer, the system will prepopulate the customer addresses you used in your previous email to that customer. This saves you time and effort.
Step-by-step guide to setting a default email
- Create or open the transaction: Begin by creating a new transaction (for example, an invoice) or opening an existing one you wish to email.
- Initiate the email Process: From the transaction window, click the email button in the main ribbon.
- Email address recipient: Select email address(es) from the dropdown or type a new email address.
- Send the email: Review the email body and subject, then click send. The transaction will be sent, and QuickBooks will now remember the address you just used.
- Default set: The next time when you email the same transaction, the previously used email IDs will appear by default in the recipient section. Deleting any of these email IDs will cause them not to automatically appear next time.
- You can manually set a particular contact email as default for a particular transaction for a customer by navigating to customer center, selecting a customer, switching to contacts tab, opening a contact, and ticking the checkbox for the transaction type. This sets that particular contact as the default email recipient for the selected transaction type.
Original article from the Firm of the Future Blog
To learn more Schedule Time for a consultation or call (617) 332-8522.